Changing And Arranging Instruments Within a Drum Kit |
 |
Roland VDrum modules organize drum kits as a collection of instruments that are assigned to each trigger input. After you have assembled a good collection of snares, toms, kicks, cymbals, and various other instruments, all that is often required to build a new kit is to choose your instruments and assign them to your pads. However, the instrument copying functions that are built in to your drum module are quite limiting. To make matters worse, some modules don't even copy all of the instrument parameters, so you still have to manually edit some parameters, such as compression and EQ, for each instrument of each kit.
The following example demonstrates how you can quickly and easily assemble a custom kit using the VDrumLib instrument copying functions. You'll have access to several instrument copying functions that are not possible on your module, and ALL instrument parameters are copied (including EQ and compression), so it won't be necessary for you to follow-up with manual hand edits. |
|
Step
1: Expand Kit Folders To View Instruments |
|
VDrumLib organizes each drum kit as a folder containing a list of instruments that are arranged in numerical order of your trigger input, i.e. the first instrument in the list is assigned to the pad on trigger input#1. To expand a drum kit folder and access the instruments within the drum kit, just click on the "+" icon located to the left of the drum kit name. Likewise, to hide the instruments, click on the "-" to collapse the drum kit folder. |
|

NOTE: Although each instrument has unique parameters that specify the characteristics that are unique to that instrument, each drum kit also has parameters that are common to all of the instruments in the entire drum kit. When you change instruments in VDrumLib, VDrumlib preserves these "Kit Common Parameters". The table below itemizes some of the "Kit Common Parameters" for each type of drum module.
Module |
Kit Common Parameters |
TD-6 |
Name, Ambience(Studio Type, Wall, Room Size, Overall Level), Pedal Hi-Hat Volume & Pitch, Master EQ, Master Volume |
TD-8 |
Name, Ambience(Studio Type, Wall, Room Size, Overall Level), Brush Switch, Pedal Hi-Hat Volume & Pitch, Master EQ, Master Volume, Group Send Levels |
TD-10 |
Name, Perc Group, Ambience(Studio Type, Wall, Room Size, Mic Pos., Output Levels), Switches(Brush, X-Stick, Ambience, EQ, Comp, EFX), Efx(Type, params), Pedal Hi-Hat Volume, Master EQ, Master Volumes, Group Send Levels(Amb, Efx) |
TD-10Exp |
Name, Ambience(Studio Type, Wall, Room Size, Mic Pos., Output Levels), Switches(Brush, X-Stick, Ambience, EQ, Comp, EFX), Efx(Type, params), Pedal Hi-Hat Volume, Master EQ, Master Volumes, Group Send Levels(Amb, Efx) |
TD-12 |
Name, Tempo, Ambience(Studio Type, Wall, Room Size, Room Shape, Mic Pos., Studio Level), Switches(Brush, X-Stick, Pad Pattern, EQ, Comp, EFX), Efx(Type, Params), Pedal Hi-Hat Volume, Master EQ |
TD-20 |
Name, Tempo, Ambience(Studio Type, Wall, Room Size, Room Shape, Mic Pos., Studio Level), Switches(Brush, X-Stick, Pad Pattern, EQ, Comp, EFX), Efx(Type, Params), Pedal Hi-Hat Volume, Master EQ |
|
|
Step
2: Copy An Instrument |
|
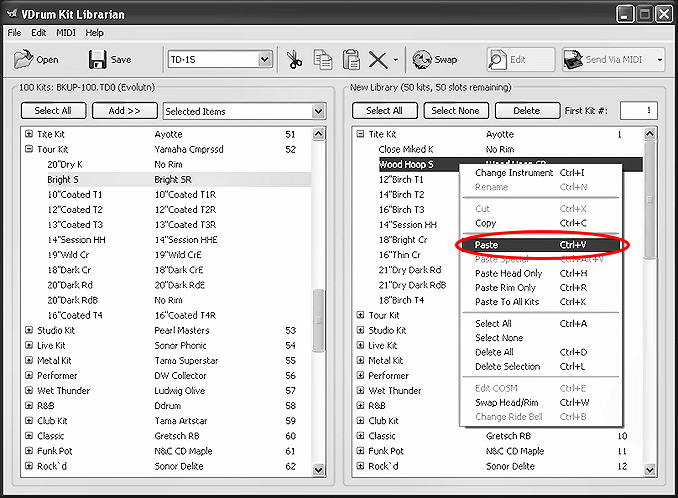
Instruments in each drum kit can be easily changed using the "Copy and Paste" functions available from the VDrumLib Edit menu. There are actually multiple methods to access the Edit Menu functions: (1) Directly from the menu, (2) Via the Toolbar icons, (3) Right click on the selected instrument to pop-up the Edit menu, or (4) Keyboard shortcuts i.e., ctrl+C = copy, ctrl+W = swap head and rim instruments, etc. The screen image below shows the "right click" pop-menu method. Instruments can be copied from either the source list on the left, OR the destination list on the right. However, you can only paste instruments into kits in the destination list on the right. |
|
NOTE: When you copy an instrument in VDrumLib, VDrumlib copies ALL of the parameters that define the sound of the instrument -- this includes everything except the MIDI Information which stays with the pad. The table below itemizes some of the "Instrument Parameters" copied by VDrumLib for each drum module.
Module |
Instrument Parameters |
TD-6 |
Head and Rim (Instrument#, Pitch, Decay, Pattern#, Level, Amb. Send), Panning |
TD-8 |
Head and Rim (Instrument#, Pitch, Decay, Pattern#, Pattern Vel., Level, Amb. Send), Panning, COSM |
TD-10 |
Head and Rim (Instrument#, Pitch, Decay, Level, Pattern#), Panning, Output, Compression, EQ, Mic (Type, Pos.), COSM |
TD-10Exp |
Head and Rim (Instrument#, Pitch, Decay, Level, Pattern#, Pattern Vel.), Panning, Output, Compression, EQ, Mic (Type, Pos.), COSM, Pedal Pitch |
TD-12 |
Head and Rim (Instrument#, COSM, Pattern#, Pattern Vel., Mixer Vol., Panning, Amb Send Lvl., EFX Send Lvl., Min. Vol., Compression, EQ, Pedal Pitch) |
TD-20 |
Head and Rim (Instrument#, COSM, Pattern#, Pattern Vel., Mixer Vol., Panning, Amb Send Lvl., EFX Send Lvl., Min. Vol., Compression, EQ, Pedal Pitch) |
|
|
Step
3: Paste The Instrument |
|
VDrumLib offers several types of paste operations that can be used to paste instrument data: (1) Paste both Head and Rim instruments (ctrl+V), (2) Paste only the Head (ctrl+H), (3) Paste only the Rim (ctrl+R). |
|
|
|
Step 4: Copying Multiple Instruments From One Kit and Pasting Them To Multiple Kits |
|
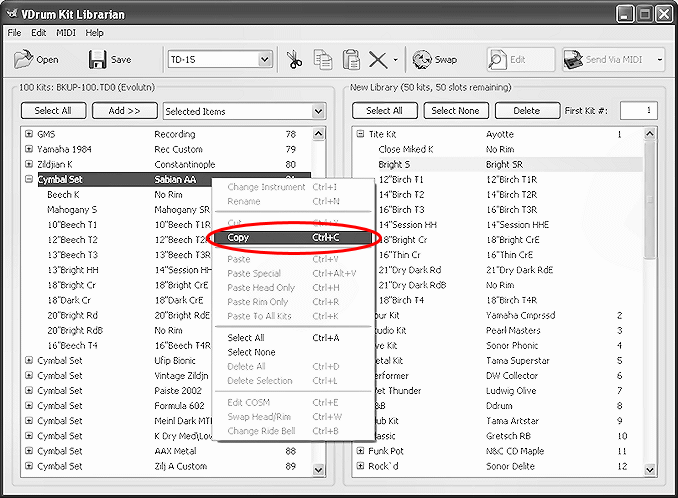
Let's say you want to copy ALL of the cymbals from one kit and paste them into multiple kits at the same time. Or maybe you want to copy just the AUX1 Rim instrument from one kit and paste it to the AUX2 head pads in all of the other drum kits. VDrumLib has a very powerful function called "Paste Special" to accomplish these kinds of tasks very rapidly. Follow the screen flow below to see how quick and easy it is to accomplish this otherwise time consuming task.
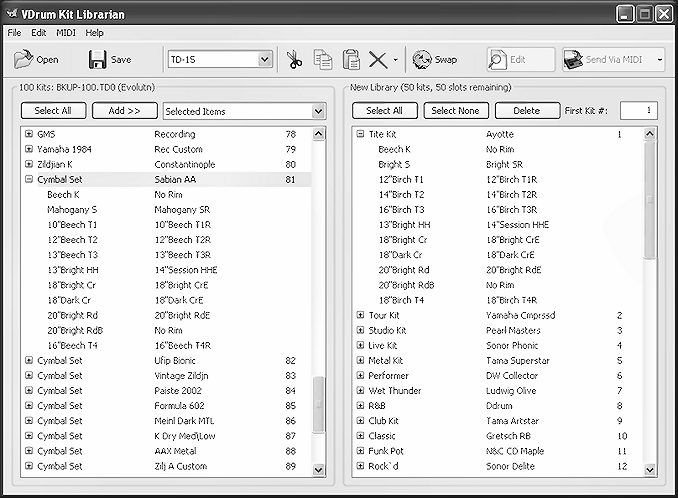
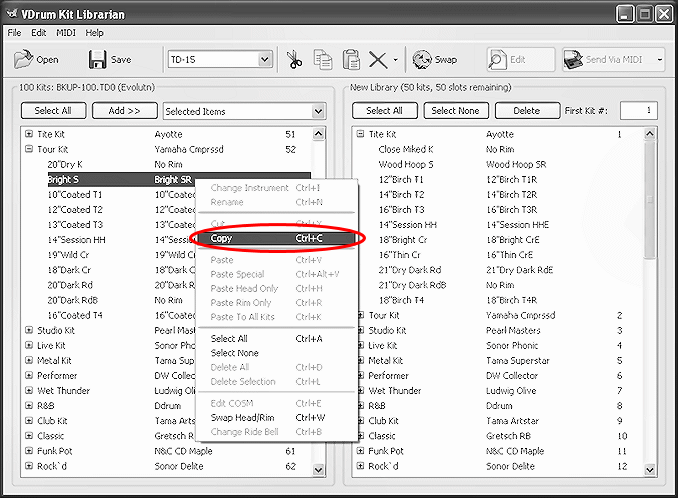
The fist screen shot shows a special drum kit called a "Cymbal Set " that is filled with Sabian AA cymbals. In this example, we will copy all of the cymbals and the kick drum head and paste it to another kit. The first step is to copy the entire kit called "Cymbal Set Sabian AA." The screen below shows the use of the "right-click" menu to select the "Copy" command. You can also just click to select the kit and use the Ctrl-C keyboard shortcut.
|
|
|
|
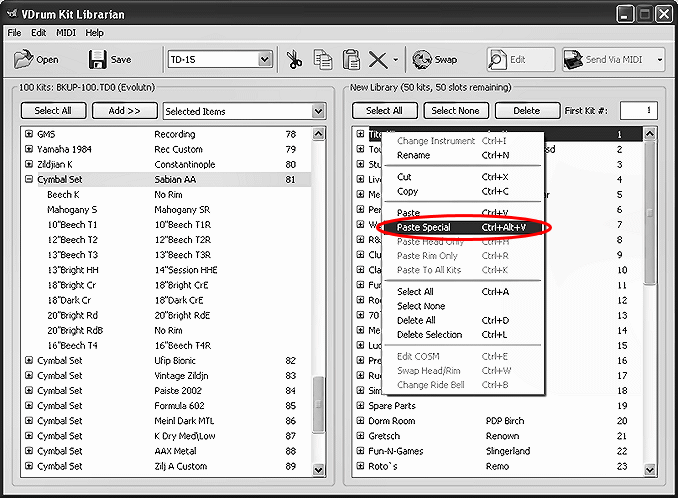
The next step is to select all of the kits that we want to paste these instruments into and then choose the "Paste Special" function. In the example shown below, we only selected a single kit, then right-clicked on it to select the "Paste Special" command from the contextual pop-up menu. If you are selecting multiple kits, it is easier to use the keyboard short-cut of Ctrl+Alt+V. On a Mac, the keyboard shortcut is Cmd+Alt+V. On both OS's it is the same as the Paste shortcut with the added Alt key. |
|
|
|
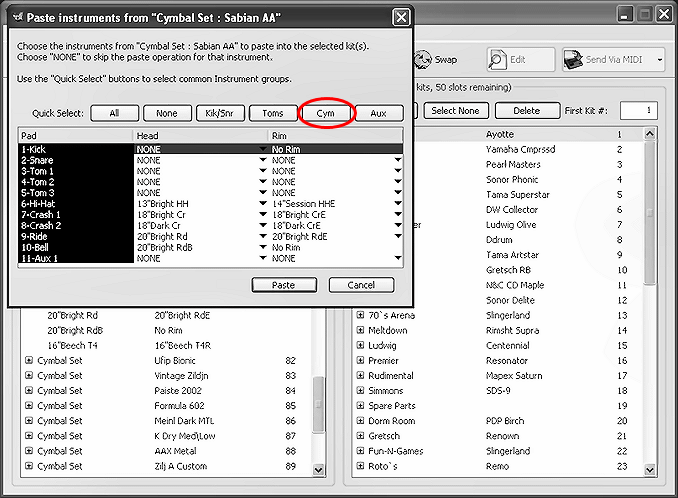
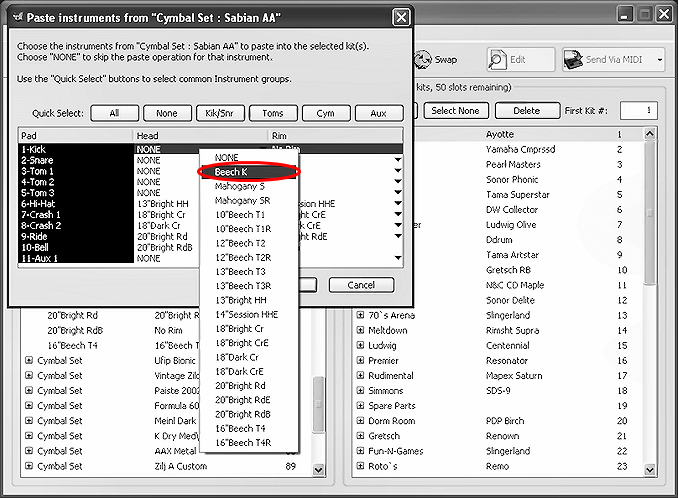
Next, the paste special dialog box will be displayed to allow you to choose which instruments to copy to which pads of the destination kit(s). You don't have to paste all of the instruments, and you don't have to paste them to the same pads as the original source kit.
Since we want to copy Only the cymbals and kick, frst click on the "None" button to deslect all of the pads, then click the "Cym" button to select all of the cymbals. |
|
|
|
Since we also want to copy the Kick head and place it onto the Kick pad, just click on the cell in the Kick row and Head column. A menu will pop-up allowing to choose which instrument to copy to the kick head. In the example we chose the kick instrument, but you could select any of the instruments or even NONE if you want to preserve the instrument for that pad in all of the destianion kits. You can do this for all of the pads, if you want. |
|
|
|
Once, you have assigned all of the instruments that you want to copy, just click on the "Paste" button. VDrumLib will then copy all of the instruments that you specifed to all of the kits that you specified in fraction of a second. |
|
|
|
| You can inspect the results of the paste special operation, below. Note that destination kit "Tite Kit Ayotte" now has the same kick and cymbals as the "Cymbal Set Sabian AA," while all of the other instruments are untouched. If you forgot to select a few kits before performing the paste special, you can just select them now and CTRL+ALT+V again to open the paste special dialog box configured in the exact same way as you left it. So, all you would need to do is press the "Paste" button, again. |
|
|
|
Step 5: Changing Only The Rim OR Only the Head Instrument |
|
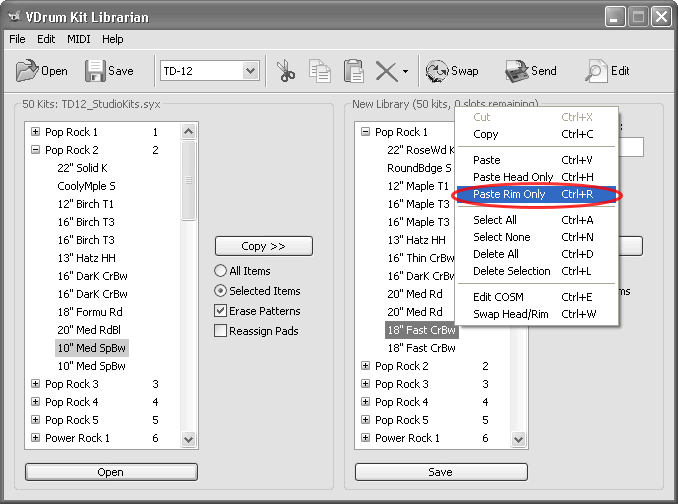
This step shows yet another paste function -- pasting of ONLY the rim instrument. In the right click edit menu just choose the "Paste Rim Only" funtion. The keyboard shortcut is Ctrl+R. |
|
|
|
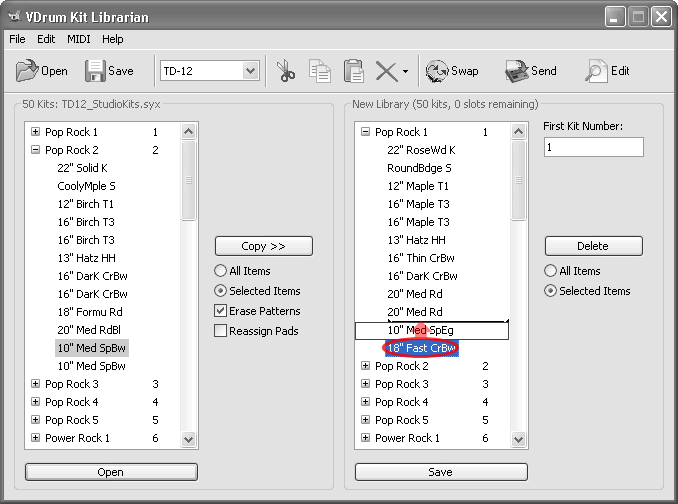
Step 6: Swapping The Instruments Between Head And Rim |
|
This step shows how to use the right click edit menu to swap the head and rim instruments of a single pad. |
|
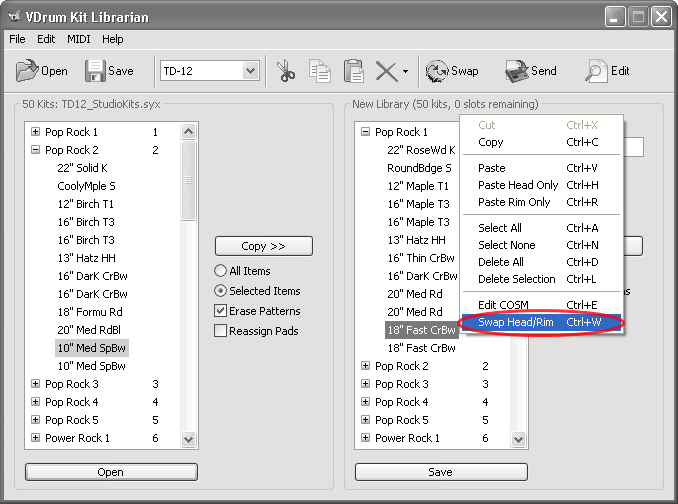
TIP: By using the "Swap Head & Rim" function (ctrl+W) in combination with the "head only", or "rim only" paste operations, you can duplicate head and rim instruments, or paste a rim from another instrument into the head of another instrument, and vice verse. For example, to paste the head instrument into the rim position, you would (1) swap, then(2) paste head, then (3) swap.
|
|
Step 7: Changing Ride Bell Type (TD-6 and TD-8 Only) |
|
Because the TD-6 and TD-8 modules don't natively support 3-zone ride cymbal triggering, most people use a two zone ride cymbal. However, there are two different kinds of two-zone ride cymbals and two different ways to setup the ride cymbal instruments. Unfortunately, it isn't easy to change the instruments on your module if your kits are setup for the opposite ride configuration. For this reason, VDrumLib has an instrument editing feature that allows you to quickly and easily change the ride cymbal instrument configuration between these two different types.
|
|
|
|
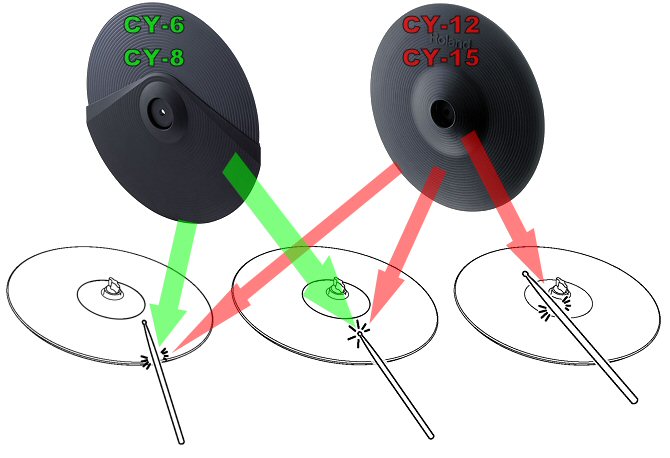
As shown in the figure above, a CY-8 or CY-6 only has two strike zones -- bow and edge. However, the CY-15R and CY-12R/C each have three strike zones -- bow, bell, edge. In either case, though, the TD-6 and TD-8 can trigger only 2 different instruments from your ride cymbal. So, if you have a CY-6 or CY-8, you only have one choice -- bow and edge. For this configuration, Roland has created a special category of ride bow instruments that can play BOTH the bow sound and a bell sound. When you hit it hard, it will play an accented bell sound. But, light to medium sticking will produce a normal bow sound. These special ride instruments are designated by an X after their instrument name. For example, instrument #638 is called "Jazz RdX" and it combines the bow sound of instrument #635 "Jazz Rd" with the bell sound of instrument #637 "Jazz RdB". Like other RdX instruments, #638 "Jazz RdX" is intended to be used as the "head" instrument along with #636 "Jazz RdE" as the rim/edge instrument on your CY-6/8.
However, if you have a CY-12R/C or a CY-15R, you have to choose between using the bow/bell output jack, or the bow edge output jack -- this is a matter of personal taste. If you use bow/edge, then the RdX/RdE instruments are what you want. However, if you use the Bow/Bell input, then you would want to use a RdB instrument as your rim instrument, and a regular Rd(without the X) instrument for the main head instrument.
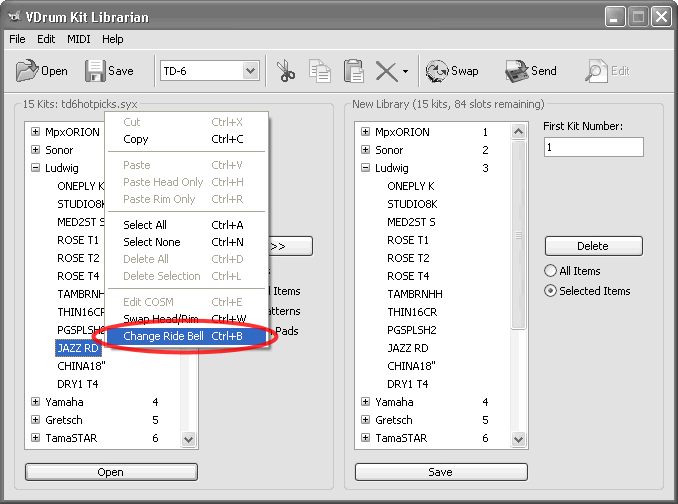
So, what if you have several drum kits that are setup for Bow/Edge (RdX/RdE), and you want to change them to Bow/Bell (Rd/RdB)? Just use the "Change Ride Bell" function (ctrl+B) as shown below. Each time you use the function, it will toggle both ride instruments between (bow/bell) or (bow/edge) configurations. Of course, this function will ONLY be accessible on pads that are already setup with ride cymbal instruments. |
|
|
|
Step 8: Moving Instruments To Different Pad Locations |
|
Just as with drum kits, VDrumLib also allows you to change the order of the instruments in a kit by simply dragging an instrument to a new spot. Unlike the copy and paste operations, though, the MIDI parameters are also dragged with the instrument to the new pad position. |
|
TIP: If you want to rearrange multiple instruments in multiple kits. You should consider using the global "Reassign Pads" function that is described on this page.
|
|
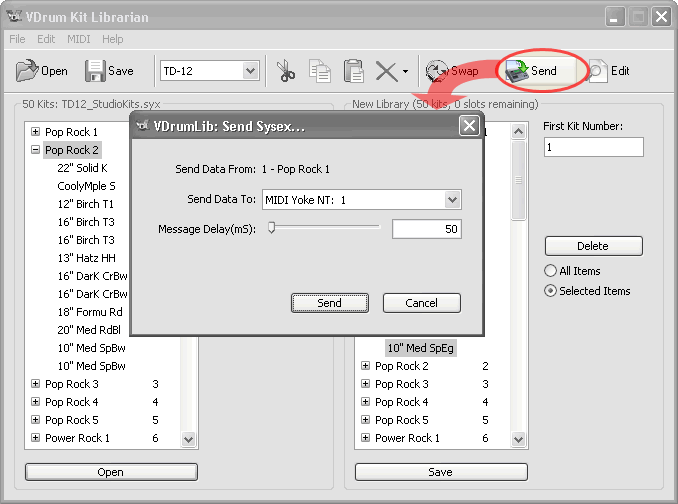
Step 9: Sending A Single Kit To Your Drum Module Via Midi (TD-3, 6, 8, 10, 10, 12, 20, Only) |
|
As you build your kits, you might want to hear what it will sound like on your drum module. To send a single kit to your drum module, you can use the "Send Single Kit" option from the MIDI Menu. There are 3 ways to invoke this option (1) directly from the MIDI menu, (2) Keyboard shortcut (ctrl+M), or by (3) clicking the "Send" icon on the toolbar. The screen image below demonstrates the toolbar icon method. |
|
|
|
Step
9: Edit Instrument Parameters (TD-3, 6, 8, 9, 12, 20 ONLY) |
|
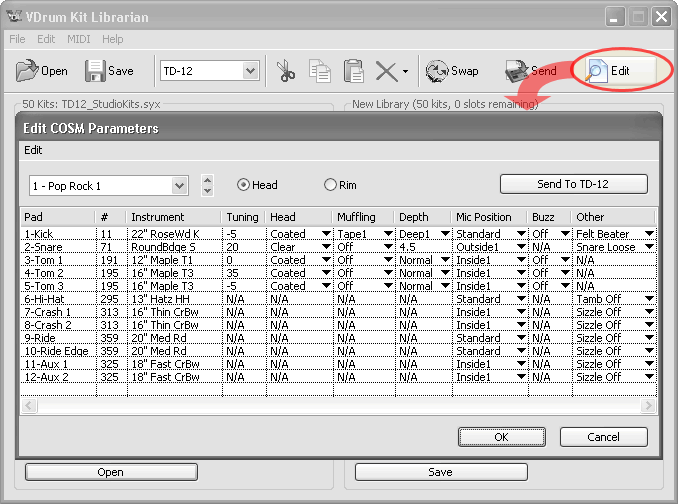
Finally, VDrumLib has a built-in editor that allows you to view and change instrument parameters. You can access the editor by (1) clicking on the Edit icon on the toolbar, as shown below, or (2) Directly from the Edit menu, or (3) Via the "right click" pop-up edit menu, or (4) via keyboard shortcut (ctrl+E). For more instructions on using the editor, click here. |
|
|
|
|
|