|
Step
1: Make Connection From Your Computer To Your Module |
|
Locate the MIDI connection jacks on the back panel of your module and connect your adapter cables. Data flow markings on MIDI cables seem to vary from manufacturer to manufacturer. However, the cable labeled OUT, or with arrows that show data flowing into the cable, is usually hooked up to the MIDI OUT/THRU jack on your module. Likewise, the cable labled IN, or with arrows showing data flowing out from the cable, is usually hooked up to the MIDI IN jack on your module. |
 |
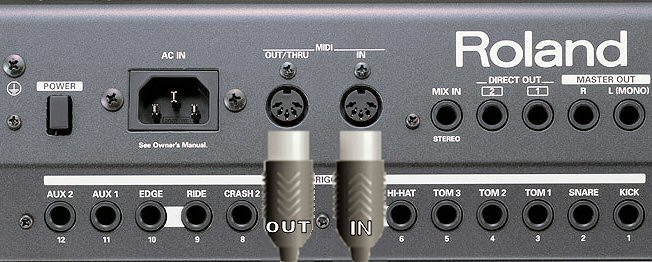
WARNING: Unfortunately, the labeling convention shown here isn't always followed. So, if your module will not send or receive any data to VDrumLib, the first thing you should try is swapping the cables by connecting the IN cable to the modules OUT/THRU jack, and the OUT cable to the modules IN jack.
|
|
|
Step
2: Select MIDI Receive Option |
|
To have VDrumLib receive a SYSEX backup from your Roland Module, select the Receive Sysex Data option from the MIDI drop down menu. As a result, VDrumLib will display the "Receive Sysex" dialog box. |
|
|
|
|
Step
3: Select Your MIDI Interface Device |
|
Before you can start the data acquisition process, VDrumLib needs to know which MIDI input device you have hooked up to your Roland drum module. You can select your MIDI input device from the drop down list at the top of the dialog box. |
|
NOTE: If you are using a USB to MIDI adapter, and you do not see your MIDI device in the list, press the cancel button. Then, make sure your device is plugged in and initialized before starting over with step 1, above.
|
|
|
Step
4: Start The Sysex Data Acquisition Process |
|
Now that VDrumLib knows which MIDI input is hooked up to your Roland drum module, you can start the data acquisition process by simply pressing the Start button, which is located at the bottom right corner of the dialog box. To indicate that it is now ready to start receiving sysex data from your Roland drum module, VDrumLib will display a "Waiting for data..." message directly below the MIDI input device selection list. |
|
|
|
|
Step
5: Start The MIDI Bulk Dump On Your Roland Drum Module |
|
Now, on your Roland drum module, navigate to the MIDI bulk dump screen and start the MIDI bulk dump. Although the actual steps vary from module to module, a MIDI bulk dump is usually initiated by first pressing the [SETUP] button, then selecting the MIDI Bulk Dump option. Click the icon at the top of the the following table for more specific instructions for the selected Roland Module. |
|
|
|
|
|
|
|
From Page 103 of TD-6 Owners Manual:
- While holding down [SHIFT], Press [EDIT/SETUP], then press the "Right Cursor" button to select bulk dump, then press the "enter" button. [EDIT] lights, and the "BULK DUMP" screen appears.
- Press [INC/+] or [DEC/-] to select “The transmit Data” option, then press the enter button. Your choices are:
- All data (Setup, Kits, User Songs)
- Setup (this includes all trigger and pad settings)
- All user SONGS
- All kits
- A single kit
- Press the Enter button to start transmitting the data to VDrumLib. When, done, your TD-6 will display a message indicating that the transfer is COMPLETED!
|
|
|
|
Step
6: Wait For The End Of The MIDI Transmission |
|
While VDrumLib is receiving MIDI data, the reception status message will say "Receiving data...", and the count of bytes received will continue to increment. When your drum module has no more data to send, it will display a "Completed!" message. At this point, the byte count on the VDrumLib status message will stop incrementing, and it is time to press the Stop button. |
|
|
|
|
Step
7: Save The Bulk Dump |
|
To save the MIDI bulk dump, simply press the Save button. You will be prompted with a standard Windows "Save As" dialog box to choose a name and location to save your MIDI *.syx bulk dump. Note, the .syx file extension will automatically be added to the file name if you don't type one in. |
|
|
|