Creating and Managing Your Kit Libraries |
 |
The most basic function of VDrumLib is to create groups of drum kits called kit libraries. The following instructions outline the basic steps required to (1) add kits into a new library, (2) organize and rename the kits in the library, and (3) save the library to a file that is ready to transfer to your drum module. |
|
Step
1: Choose Your Drum Module |
|
VDrumLib uses the same user interface for importing, building and editing custom kit libraries for all of the following Roland VDrum modules: TD-3, TD-6, TD-8, TD-9, TD-10/EXP, TD-11, TD-12, TD-15, TD-20/EXP, or TD-30. However, the format of the data contained in the backup files is unique for each type of module. To configure VDrumLib to save your new custom backups to the correct data format, just select your drum module from the drop down list that appears on the toolbar. |
 |
|
 |
Step
2: Open A Library That You Want To Copy Kits From |
|
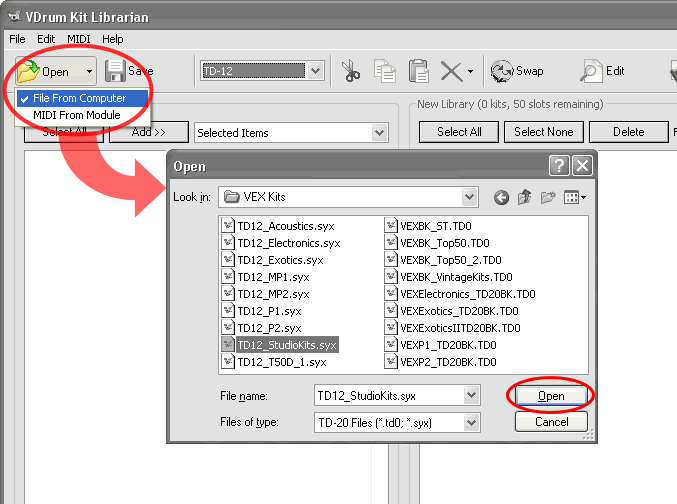
To open an existing library file that contains kits that you want to copy, press the Open button which appears in the toolbar directly above the "Source Library" selection list. From the dropdown list, choose the "File From Computer" option. You will then be prompted with a standard Windows "Open File" dialog box. Navigate to the file that you want to open, select it, and click the Open button in the Windows "Open File" dialog box. If the file you selected contains at least one drum kit, VDrumLib will extract the kit data for all the kits and place the kit names in the "Source Library" selection list. |
 |

TIP: Some modules support more than one file type
for kit backups. Even though the data structures in each format may differ, VDrumLib allows you to import and mix kits from all formats that each module supports. For example, TD-20 owners can take kits from a TD-20 *.syx backup and mix them with kits from
a TD-20 *.td0 backup. Then, you can save the backup to either *.td0 backup or *.syx backup, regardless of which backup format the kits originally came from. For a list of file types supported by each module, see the table below:
Module |
Supported File Formats |
TD-3 |
*.syx midi backup |
TD-6 |
*.syx midi backup |
TD-8 |
*.syx midi backup |
TD-9 |
*.td9 USB flash drive backup |
TD-10 |
*.syx midi backup, *.td1 VKitTrans backup |
TD-10Exp |
*.syx midi backup, *.td1 VKitTrans backup |
TD-11 |
*.td0 USB flash drive backup |
TD-12 |
*.syx midi backup , TD-20 *.td0 compact flash backup |
TD-15 |
*.td0 USB flash drive backup |
TD-20 |
*.syx midi backup, *.td0 compact flash backup |
TD-30 |
*.td0 USB flash drive backup |
|
 |
Step
3: Copy Kits To New Your New Library |
|
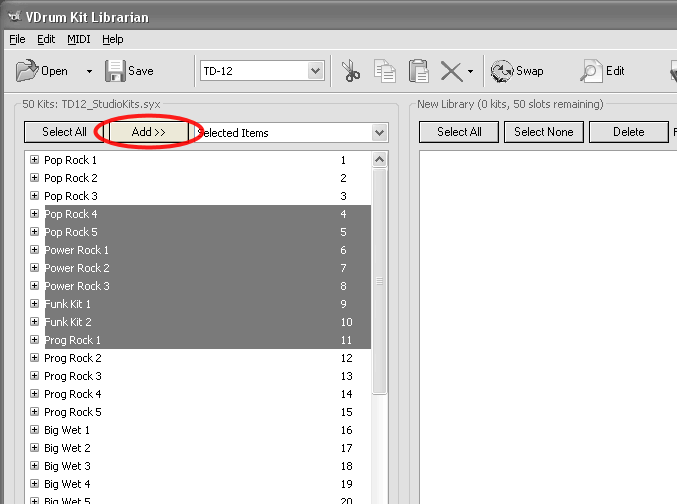
To choose which kits you want to copy into your new kit library, either click the "Select All" button, or use your mouse to select the kit(s) from the "Source Library" selection list. Then, press the Add button located directly above the "Source Library" selection list. The kit(s) that were selected will then be copied to the new library and their kit names will appear in the "New Library" selection list. You can repeat the "select and add " operation until all of the kits you desire have been copied, or you until you fill up the list with the maximum number of kits that your module will allow. You can also open other existing kit libraries to select and add kits into the new library. |
 |

TIP: You can select more than one kit at a time if you "drag" your mouse to select a block of kits from the selection list. You can also use the "shift+click" or "control+click" keyboard/mouse combinations to select multiple kits.
|
 |
Step 4: Rearrange The Kits In Your New Library |
|
To change the order of kits in your new library, just select one or more kits and drag them to a new row position. When you drag, the target for the drop location is indicated by a solid line between the rows. You may also remove one or more kits from the new kit library by selecting the kit(s) from the list and pressing the Delete button which is located directly above the "New Library" selection list. To start all over and create a new kit library, you can delete all of the kits by pressing the "Select All" buton prior to pressing the Delete button. |
 |
|
 |
Step 5: Choose The Kit Number That You Want To Start Your New Library At |
|
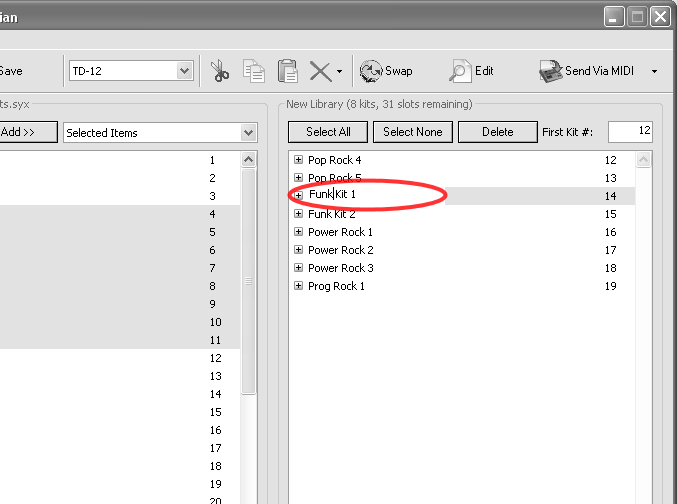
By default, the kit number/location of your first kit in your new library is kit number 01. However, you might not want to overwrite some of your current kits in your drum module when you load a new kit library. The First Kit # edit field tells VDrumLib to start your new kit library at location other than kit location 01. VDrumLib will automatically locate the kits sequentially, starting with the number typed in this edit field. For example, if you have 8 kits in your new library starting at number 12, then the kits will be stored in kit locations 12, 13, 14, 15, 16, 17, 18 and 19. |
 |
|
 |
Step 6: Renaming Kits in Your New Library |
|
If you wish to change the name of one or more kits in your new library, VDrumLib has a built-in kit name editor that allows you to type in a new name using your keyboard. To activate the kit name editor, just use your mouse to double-click on any kit name in the "New Library" list. This will turn the selected kit name into a standard editable text field with a blinking cursor. Then, type the new kit name on your keyboard and press the enter/return key when done. |
 |

TIP: The editable text field supports standard text editing tools such as drag selection of text, cut(Ctrl+X), copy(Ctrl+C), paste(Ctrl+V), undo (Ctrl+Z), and delete. In addition, VDrumLib enforces the kit naming rules of the selected drum module. The rules enforced are maximum character length and character validity.
|
 |
Step 7: Copying Setup Info (TD-9, TD-11, TD-15, TD-20, and TD-30) |
|
If your module doesn't support backups via USB Flash Stick , or compact Flash, then you can skip this step and proceed with step 8. However, if you are using a Compact Flash Card or USB Flash stick to transfer your kits, there is one more thing that you need to copy -- the setup info. If you have already copied this setup info to your new kit library, then it will appear at the top of the kit list as indicated in the circled item in the picture below. If you have this info, you can proceed to step 8 to save your .TD0 or .TD9 file.
If you haven't copied the setup info, yet, then you need to open a .TD0/.TD9 file that contains a backup of your own personal trigger settings. When you open the .TD0/.TD9 file, the first item in the list will not be a drum kit. Instead, it will be labeled Setup Info, and it will have the TD0 file extension listed in the kit number column. To copy this info, just select it by clicking on it with your mouse, then click the Add button -- just like copying a drum kit. |
 |
|
 |
Step
8: Save Your New Library |
|
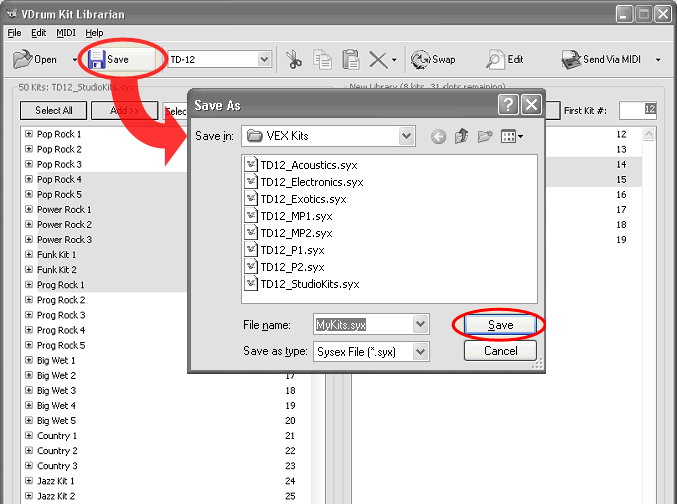
Once you have fully populated and arranged all of the kits in your new kit library, you need to save the new library to a file on your hard drive before you transfer it to your drum module. To save your library, simply press the Save button on the toolbar. You will then be prompted with a standard Windows "Save As" dialog box to choose a name and location to save your new kit library. |
 |

NOTE: Kit libraries that have been saved using the *.syx file format can be transferred to your Module using the MIDI Transmit function of VDrumLib. However, kit libraries saved as .td0 or .td9 files can only be transferred using a Compact Flash Card or USB Flash Stick.
|
|